
Have you ever felt trapped in the cycle of a denied insurance claim? You are not alone; many practitioners have faced challenges in securing fair compensation for their services over the years. Often, this stems from a lack of clear guidance on how to properly fill out and submit claims. The CMS-1500 form, introduced to the medical billing field in November 2005 and approved by the National Uniform Claim Committee (NUCC), is designed to help address these issues.
This form is crucial for ensuring that healthcare providers receive appropriate compensation for their efforts. While it is regarded as one of the most effective paper claims available, filling it out accurately requires careful attention and a thorough understanding of its components. Including additional claim information on the CMS-1500 form is essential to ensure proper processing and payment.
This blog aims to provide a comprehensive overview of the CMS-1500 form and the best practices for completing it correctly. Let’s take a closer look at each section of this essential claim form to maximize its potential benefits.
Intro Claim Forms
Claim forms are a vital part of the healthcare system, a way for healthcare providers to communicate with insurance companies and get paid for medical services rendered. The most common claim form is the CMS-1500 form which is used by healthcare providers to bill Medicare and other government insurance for outpatient services. Completing claim forms accurately is key to smooth claims processing, timely payments and recognition of healthcare providers.
What is the CMS 1500 Form?
The CMS-1500 form, also known as the HCFA 1500 claim form, is a professional document used for submitting health insurance claims.
The CMS-1500 form is a standard claim form used by healthcare providers to bill Medicare and other government insurance plans for outpatient services. It’s used to submit claims for medical, surgical, and diagnostic services, such as doctor visits, physical therapy sessions, and diagnostic tests.
Including the authorized person’s signature, along with the patient’s signature, is essential to ensure the claim is complete and processed effectively.
This form is primarily used by non-institutional healthcare providers, such as doctors, therapists, and chiropractors. It’s not typically used for private insurance companies, but they might have similar medical claim forms.
The History of the CMS-1500 Form
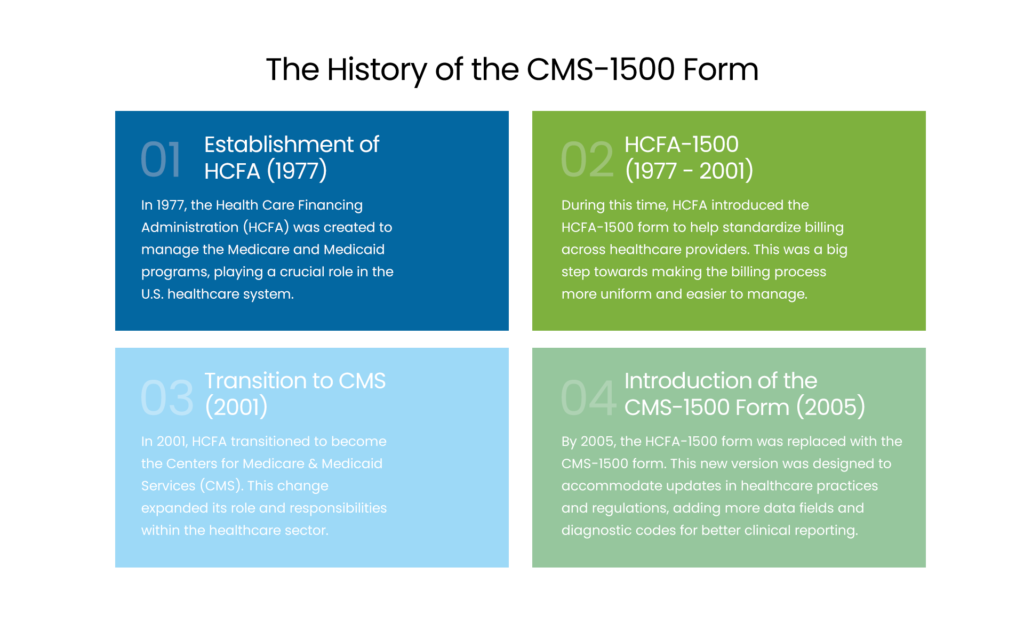
- Establishment of HCFA (1977)
In 1977, the Health Care Financing Administration (HCFA) was created to manage the Medicare and Medicaid programs, playing a crucial role in the U.S. healthcare system.
- HCFA-1500 (1977 – 2001)
During this time, HCFA introduced the HCFA-1500 form to help standardize billing across healthcare providers. This was a big step towards making the billing process more uniform and easier to manage.
- Transition to CMS (2001)
In 2001, HCFA transitioned to become the Centers for Medicare & Medicaid Services (CMS). This change expanded its role and responsibilities within the healthcare sector.
- Introduction of the CMS-1500 Form (2005)
By 2005, the HCFA-1500 form was replaced with the CMS-1500 form. This new version was designed to accommodate updates in healthcare practices and regulations, adding more data fields and diagnostic codes for better clinical reporting.
NPI Coding Problems? We’ve Got You
Finding it tricky to fill NPI fields on CMS‑1500? Trust our team for accurate, expert billing support.
Overview of CMS-1500 Form Sections
The CMS-1500 form consists of 33 fields that together provide a detailed summary of the patient, the services rendered, and the billing information. Filling it out accurately is essential for smooth insurance claim submissions and processing, ensuring that healthcare providers can get reimbursed for their services efficiently.
- 1-13: These sections gather patient and insured information, patient’s name, address, birth date, sex, insurance info and is the condition work related, auto accident or other type of accident. Also include the insured’s birth date for accurate claim processing.
- 14: This section is for the date of current illness, injury or pregnancy. Make sure to report current services and any hospitalization dates related to the patient’s condition.
- 15-17: These sections capture additional dates related to the patient’s condition and treatment, prior illnesses or hospitalizations. Make sure to enter the applicable qualifier and qualifier for these dates for accurate claim processing.
- 18-23: Here’s where you collect information about the referring provider, extra claim details, external lab data and diagnoses. Make sure to check if the patient’s condition is related to another accident to determine the correct insurance coverage.
- 24-30: These sections detail the services provided, service date, location, procedures performed, charges and number of days or units billed. Make sure to check the box for each field, document the medical service provided and include the original reference number for resubmitted claims. Also detail the patient’s relationship to the insured, any payment received, prior authorization number and the provider agrees to the terms of the payer’s program.
- 31-33: These final sections are for the provider’s information and claim certification, provider’s name, address, NPI number and signature. Make sure to include the rendering provider’s name, rendering provider’s NPI, service facility location NPI and any unique identifier required for accurate claims processing.
How to Fill out a CMS 1500 Form
Filling out CMS-1500 forms correctly is essential for ensuring that claims are processed and paid quickly. Here are some key guidelines to fill out this form:
- Always use black ink and print clearly within the designated boxes to facilitate reading by Optical Character Recognition (OCR) technology.
- Avoid using punctuation or special characters.
- Use the correct codes for the place of service, type of service, and diagnosis.
- Complete all required fields, including the provider’s NPI number, the billing provider NPI, and the patient’s insurance policy number.
- Verify that the total charge is accurate and corresponds to the sum of the line item charges.
Refer to the NUCC for additional guidance on this matter.
Note:
“The only acceptable claim forms are those printed in Flint OCR Red, J6983 (or exact match) ink. Although a copy of the CMS-1500 form can be printed from our software, copies of the form cannot be used for submission of claims since your copy may not accurately replicate the OCR color of the form. The majority of paper claims sent to carriers and DMERCs are scanned using Optical Character Recognition (OCR) technology. This scanning technology allows for the data contents contained on the form to be read while the actual form fields, headings, and lines remain invisible to the scanner.”
Here’s how to fill out the CMS-1500 form:
| CMS 1500 Field Location | Required Field | Description and Requirements |
|---|---|---|
| 1 | Optional | Box 1 on the CMS-1500 form is used to specify the type of health insurance coverage associated with the claim. Select the appropriate box for the coverage type (e.g., Medicare). Seven different plan types are available, but only one can be chosen. |
| 1a | Required | Provide the patient’s Medicare beneficiary identifier, indicating whether Medicare is the primary or secondary payer. |
| 2 | Required | Enter the patient’s name as it appears on their ID card. For newborn claims using the mother’s ID, input the infant’s name. This is valid only during the birth month and the following month. In Box 19, note “Newborn using Mother’s ID” or specify “(twin a)” / “(twin b).” |
| 3 | Required | Record the member’s date of birth and mark the gender box (male or female). |
| 4 | If Applicable | Only required when billing for an infant using the mother’s ID. |
| 5 | Required | Provide the member’s complete address and telephone number. |
| 6 | If Applicable | Patient’s Relationship to Insured – Only “Self” or “Child” options are valid. |
| 7 | Not Required | Fill in the address for the insured individual. |
| 8 | Not Required | Patient Status. |
| 9a-d | Not Required | Include details such as other insured’s name, group/policy number, employer or school, and plan/program name. |
| 10a-c | Not Required | Patient’s Condition Relation. |
| 10d | Not Required | Reserved for Local Use. |
| 11a-b | Not Required | Include insured’s name, group/policy number, employer/school, and plan/program name. |
| 11c | If Applicable | For Medicare/Medi-Cal crossover claims, enter the Medicare Carrier Code. |
| 11d | Required | Indicate whether another health plan exists by checking “Yes” or “No.” |
| 12 | Not Required | Signature and Date. |
| 13 | Not Required | Insured’s or Authorized Person’s Signature. |
| 14 | Required | Enter the first symptom date, accident date, or last menstrual period (LMP). |
| 15 | Not Required | If the patient had the same or similar condition before, provide the initial occurrence date. |
| 16 | Not Required | Include dates when the patient could not work in their current job. |
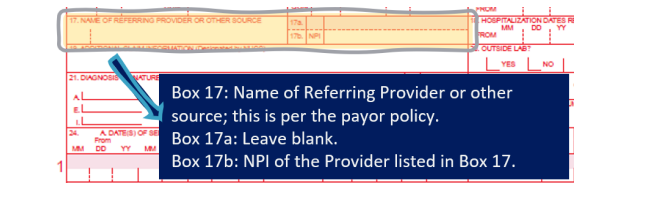
| 17 | If Applicable | Provide referring provider’s name. This person may request consultations, tests, therapy, medications, or equipment. |
| 17a | If Applicable | ID Number of Referring Physician – Enter State Medical License number. |
| 17b | If Applicable | NPI – Enter Referring Provider’s NPI number. |
| 18 | If Applicable | For hospital stays, enter admission and discharge dates. Leave discharge blank if still hospitalized. |
| 19 | If Applicable | Used for extra information, procedure justifications, or emergency certifications. Include modifiers, anesthesia times, supplies, or “By Report” codes if space allows. |
| 20 | If Applicable | Outside Lab? – Select “yes” if the diagnostic test was conducted by another provider or licensed lab. Mark “X” if applicable. |
| 21 | Required | Diagnosis or Nature of Illness/Injury – Enter complete ICD-9-CM code with all applicable digits. The primary diagnosis in 21.1 should be the main reason for service. |
| 22 | Not Required | Medicaid Resubmission Code. |
| 23 | If Applicable | Provide the prior authorization or referral number. |
How to Enter an Individual or Group Provider Identifier?
Occasionally, a payer may ask for an additional identifier on the claim in addition to the billing/rendering NPI. Here’s how to easily include this information: make sure to verify the rendering provider’s details, including the provider’s name and National Provider Identifier (NPI), to ensure accurate claims processing and reimbursement.
Referring Provider Information
Provide the name of the referring or ordering physician if a physician was involved in the order or referral of the service or item. It is mandatory for all physicians who order services or refer Medicare beneficiaries to include this information. If Medicare policy requires reporting a supervising physician, please include that in item 17. For claims that involve multiple referring, ordering, or supervising physicians, submit a separate CMS-1500 claim form for each one. Ensure that the provider’s information, including the name and NPI number, is accurately displayed in Box 24J to identify the medical service provider.
You should include one of the following qualifiers to specify the role of the physician (or non-physician practitioner):
| Qualifier | Provider Role |
| DN | Referring Provider |
| DK | Ordering Provider |
| DQ | Supervising Provider |
Place the qualifier to the left of the dotted vertical line in item 17. Box 17a is optional and can be left blank. In Box 17b, provide the NPI of the referring, ordering, or supervising physician or non-physician practitioner. It is necessary for all physicians and non-physician practitioners who order services or refer Medicare beneficiaries to include this information.
Rendering Provider Information
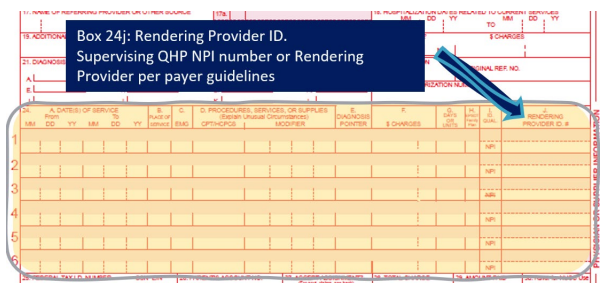
Rendering providers are responsible for delivering face-to-face services to members. In some cases, non-face-to-face services may also be reimbursed. If a payer requires the NPI number of the individual rendering provider on claims, this should be entered in Box 24J. It is crucial to accurately capture the rendering provider’s NPI in Box 24J to ensure precise identification for claims processing and reimbursement accuracy.
The supervising provider oversees the rendering providers and may also provide specific services within their scope of practice. When payer policies dictate that billing should occur under the supervision of a qualified healthcare professional (QHP), their NPI number should be included in Box 24J for all services. Only one NPI number should appear on each claim.
Here’s how to input information that will be displayed in each of these sections on the claim, according to the payer.
- Individual Providers
Your Type 1 NPI number should be entered in the unshaded portion of Box 24J on the claim form. Additionally, make sure to include your NPI number in Box 33a.
- Group Providers
All claim submissions must include both the Type 1 (individual) and Type 2 (organization) NPI information. The Type 1 NPI identifies the rendering provider, while the Type 2 NPI identifies the organization, corporation, group practice, or facility.
Enter the Type 1 NPI number in the unshaded area of Box 24J, which corresponds to the NPI of the rendering provider (the BCBA responsible for the case). The Type 2 NPI should be recorded in Box 33a, representing the NPI of the group.
Understanding the Rendering Provider
The rendering provider is the healthcare professional who sees the patient and performs the treatment, exam or procedure. This is who the patient sees and is responsible for the services provided. The rendering provider’s information is critical to identifying the correct healthcare professional for the services provided. On claim forms, the rendering provider’s information goes in Box 24J which requires the NPI number. The rendering provider is key to making sure the information on the claim form is accurate and complete so the services can be reimbursed.
National Provider Identifier (NPI)
The National Provider Identifier (NPI) is a 10 digit number assigned to healthcare providers for identification purposes. It replaced all the old identification numbers and is critical to identifying healthcare providers and their roles in the healthcare system. The NPI is a universal identifier for healthcare providers in electronic transactions and communication so healthcare providers can be properly recognized and their services recognized. On claim forms the NPI is used to identify the rendering provider, billing provider and service facility location and other entities.
Box 24J: Rendering Provider ID
Box 24J on the CMS-1500 claim form is where you put the rendering provider’s ID which is usually the NPI. Completing Box 24J correctly is crucial so the rendering provider is correctly identified and linked to the services rendered. The NPI in Box 24J helps insurance companies verify the provider’s credentials and expertise so claims can be processed and paid accurately. If an other ID Qualifier is provided, the rendering provider’s information may populate into Box 24I and Box 24J.
How to Submit Your CMS-1500 Form
After completing your form, you can submit it either by mail or electronically to the designated clearinghouse or billing software, depending on the payer’s requirements. Ensure that all financial transactions, including ‘payment received’ from other payers or patients, are accurately documented on the CMS-1500 form. Make sure to pay attention to deadlines, and be prepared to follow up or provide any additional information if requested.
Benefits of Accurate Completion
Completing Box 24J and other sections of the claim form has many benefits:
- Smooth claims processing and timely payments
- Recognition of healthcare providers for their work and services
- Fewer errors and rejections in claims processing
- Better communication between healthcare providers and insurance companies
- Better patient care and satisfaction through faster reimbursement
By having accurate information on claim forms, providers can streamline their reimbursement process, reduce administrative work and focus on patient care.
Wrap Up!
The CMS-1500 form plays a vital role in today’s healthcare system. Accurate and timely completion of these forms can enhance your administrative processes and facilitate quicker reimbursements.
As a healthcare professional with a busy schedule, simplifying your paperwork can significantly reduce the time spent managing your practice. Instead of handling this complex process alone, consider partnering with a trusted medical billing company like MedCare MSO. We provide digital billing solutions that adhere to the latest industry standards.
Contact us today to discover how we can support the growth of your practice.